Dalian Eastern Display Co., Ltd.
Dalian Eastern Display Co., Ltd.


This guide provides a comprehensive walkthrough of controlling Arduino LED segment displays, focusing on implementing effective exit conditions in your code. We'll explore various techniques, common pitfalls, and best practices for ensuring your projects function reliably and efficiently. Learn how to manage the display's output, create clean shutdown sequences, and handle unexpected events. Whether you are a beginner or an experienced programmer, this article offers valuable insights and practical examples.
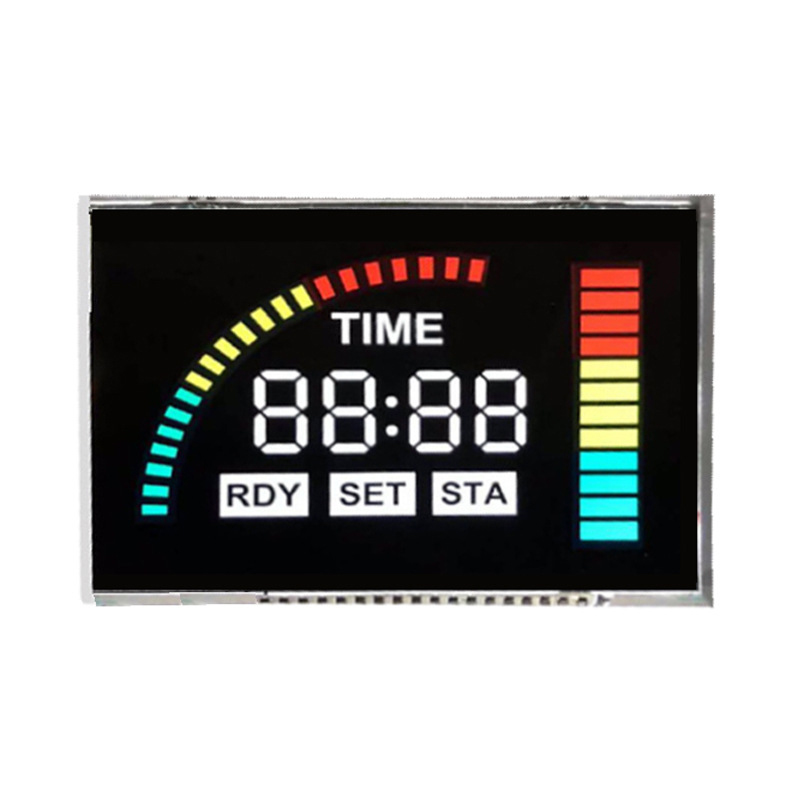
Arduino LED segment displays are common components used to display numerical or alphanumeric characters. They consist of several individual LEDs arranged in a segment pattern (usually seven segments plus a decimal point). By controlling the state (on/off) of each segment, you can display different characters. Common types include common anode and common cathode configurations, which affect how you control them. Selecting the right display for your project depends on factors like size, power requirements, and desired brightness.
Connecting your Arduino LED segment display requires careful attention to wiring. You'll need to connect each segment and the decimal point (if present) to individual digital pins on your Arduino board. Remember to observe the common anode/cathode configuration to ensure correct functionality. It's also crucial to include current-limiting resistors to prevent damage to the LEDs. Detailed wiring diagrams are readily available online for specific display models. Incorrect wiring can lead to malfunctions or even damage to your components. Using a breadboard during prototyping helps to avoid such issues. You might also consider using a dedicated LED driver IC for higher current applications. Many tutorials and examples showcase this setup process.
A simple approach involves using a Boolean variable to track the display's active state. Set the variable to 'true' when the display is active and 'false' to initiate the exit sequence. Your code can then check this variable to determine whether to continue displaying data or proceed with a clean shutdown. This method is straightforward and suitable for simple applications.
You can set a time limit for the display's operation. Use the `millis()` function to track the elapsed time since the program started. If the elapsed time exceeds the predetermined limit, the program can execute an exit sequence, turning off the display and potentially performing other cleanup tasks. This approach is effective for applications where the display needs to be active only for a specific duration. The precise timing should be tailored to specific application requirements.
Adding a button allows user interaction to control the display's active state. The code constantly checks the button's state. When the button is pressed, a signal triggers the exit sequence, terminating the display operation. This method improves user experience and provides greater control over the application. Debouncing techniques (software or hardware) are essential to avoid multiple readings from a single button press.
Integrating sensors allows for more sophisticated exit conditions. For example, if a light sensor detects low ambient light, the display could automatically switch off to conserve energy and extend battery life (relevant for portable applications). Similarly, other sensors like proximity sensors or temperature sensors could trigger the exit sequence based on predefined thresholds. The choice of sensor depends entirely on the application's context and the desired behavior.
The refresh rate determines how often the display is updated. A high refresh rate can improve visual clarity but consumes more power. Conversely, a low refresh rate saves power but might result in flickering. Consider the trade-offs between power consumption and visual quality. Optimize this rate based on your application's requirements and the capabilities of your display.
Robust code should handle potential errors gracefully. Implement checks for invalid input, sensor malfunctions, or other unexpected events. This ensures the program doesn't crash and allows for a smooth exit process even in exceptional circumstances. Proper error handling is crucial for building reliable and robust applications.
This example demonstrates a simple button-based exit for a Arduino LED segment display. Remember to adapt this code to your specific hardware configuration and desired functionality. Always refer to the datasheets for your components for accurate pin assignments and operating parameters. Note that this is a simplified example and may require modifications depending on the specific requirements of your project. The code should also include error checking and appropriate handling for various circumstances.
int buttonPin = 2; // Button connected to pin 2int segmentPins[] = {3, 4, 5, 6, 7, 8, 9, 10}; // Segment pinsvoid setup() { pinMode(buttonPin, INPUT_PULLUP); // Using internal pull-up resistor for (int i = 0; i < 8; i++) { pinMode(segmentPins[i], OUTPUT); }}void loop() { if (digitalRead(buttonPin) == LOW) { // Button pressed // Exit sequence: Turn off segments and delay for (int i = 0; i < 8; i++) { digitalWrite(segmentPins[i], LOW); } delay(1000); // Wait for 1 second before exiting while(true); // Stop the loop completely } // Display code here (Replace with your display logic) // ...}For further resources and detailed information, consider visiting the official Arduino website. https://www.arduino.cc/ For high-quality LED displays and components, you can explore options like Dalian Eastern Display Co., Ltd. https://www.ed-lcd.com/